Update Group Settings
Usage
The "Set Group Setting" action in Zenphi allows administrators to automate the management of Google Group settings in Google Workspace. You can easily configure options like who can join the group, post messages, view conversations and members, enable conversation history, and allow external members, all within a single automated workflow.
Fields
- Connection
This field establishes the connection to your Google Workspace account through Zenphi, allowing the action to access and modify Google Group settings. The connection ensures the necessary permissions are granted for managing the group.
- Group Email Address
This specifies the email address of the Google Group associated with your Google account. You need to input the group's unique email address to identify which group’s settings should be adjusted.
- Allow External Members
This setting determines whether people outside your organization can be members of the group. You have two options:
- Yes: Allows external users (outside of the domain) to become members of the group.
- No: Restricts membership to only internal users (within the organization).
- Who Can Join Group
This controls how people can join the group. The available options are:
- Anyone in the organization can join: Allows any user within your domain to join the group without needing approval.
- Anyone in the organization can ask: Users can request to join, but they need approval from the group managers.
- Only invited users: Restricts membership to users who are explicitly invited by the group managers.
- Who Can View Conversations
This setting governs who is allowed to see the messages and conversations happening within the group. Options include:
- Group members: Only members of the group can view messages.
- Group managers: Only the group managers can view messages.
- Entire organization: Anyone within the organization (even non-members) can view group messages.
- Any internet user: Makes the group's messages publicly accessible on the web.
- Who Can Post
This controls who can send messages to the group. The options are:
- Group managers: Only group managers can post messages.
- Group members: All group members can post messages.
- Group owners: Only group owners can post messages.
- Entire organization: Anyone within the organization can post messages.
- Anyone on the web: Public posting is allowed; any internet user can post messages to the group.
- Who Can View Members
This determines who can see the list of members in the group. The options include:
- Group managers: Only group managers can view the members.
- Group members: All members of the group can view the membership list.
- Entire organization: The membership list is visible to everyone within the organization, even non-members.
- Conversation History
This toggle controls whether the group's messages are archived. The options are:
- Yes: Enables archiving of all messages, meaning new conversations will be stored and visible in the group’s history.
- No: Disables archiving of new messages, although previously archived conversations will still be accessible.
Demonstration on how to use it in a flow
Here’s a step-by-step guide to using the "Set Group Setting" action in a Zenphi flow:
-
Drag and Drop the Action:
In your Zenphi flow designer, find the "Set Group Setting" action under the Google Directory category. Drag it into your flow where you want to apply group setting configurations.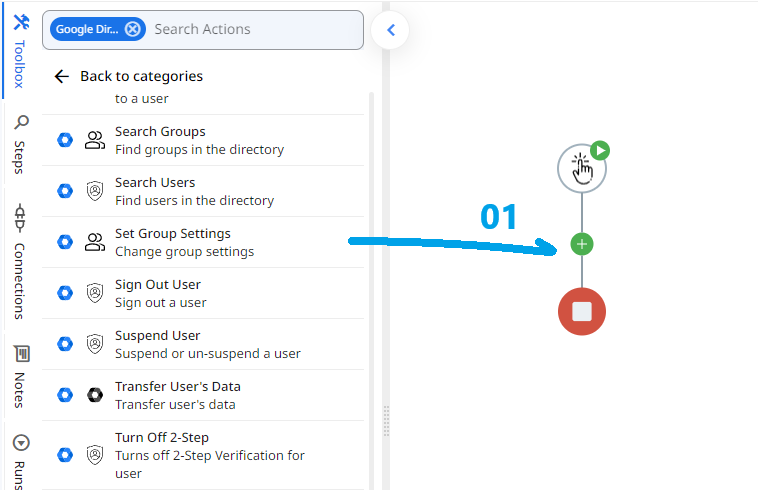
-
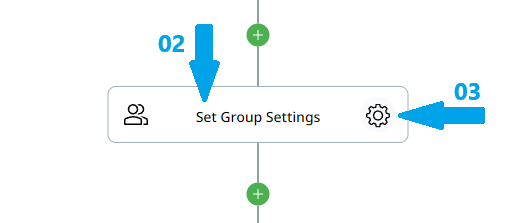
Set the name of your choice or let it be as default.
-
Click the gear icon to open its settings.
-
Connection:
Select the appropriate Google Workspace connection. This connection grants Zenphi the necessary permissions to manage Google Group settings in your domain. -
Group Email Address:
Enter the email address of the specific Google Group you want to configure (e.g., [email protected]). This ensures that the settings are applied to the correct group. -
Allow External Members:
Choose whether to allow people outside your organization to become members of the group. Set this to Yes if external members are allowed, or No if membership is restricted to internal users only. -
Who Can Join Group:
Select the option that defines how users can join the group. You can choose between allowing anyone in the organization to join, allowing users to request to join, or limiting membership to invited users only. -
Who Can View Conversations:
Specify who is permitted to view the group’s conversations. Options include restricting access to just group members or allowing broader visibility to group managers, the entire organization, or even anyone on the internet. -
Who Can Post:
Decide who is allowed to post messages in the group. You can restrict this to group managers, group members, or allow anyone in the organization or even anyone on the web to post messages. -
Who Can View Members:
Set who can see the list of group members. You can limit this to group managers, make it visible to group members, or allow the entire organization to see the member list. -
Conversation History:
Toggle the conversation history on or off. Setting this to Yes will enable the archiving of all group messages, allowing them to be stored and visible in the group history. No disables archiving for new messages, though previously archived messages will remain accessible.
-
Save and Test:
After filling out all the fields, save your flow configuration. Run a test to ensure the group settings are updated as per your requirements.
Conclusion
The "Set Group Setting" action in Zenphi streamlines the process of managing Google Group settings by automating configurations such as member permissions, conversation visibility, and posting rights. By following the steps outlined, you can easily integrate this action into your flow, ensuring efficient and consistent group management across your organization.
Updated 9 months ago