Create Role Assignment
Usage
The "Create Role Assignment" action in the Google Directory category for Zenphi enables you to assign predefined roles to users within your Google Workspace environment. This action is essential for managing user permissions efficiently, allowing you to specify role assignments at different organizational levels, from entire domains to specific organizational units. It ensures that users have the correct access and permissions according to their roles and responsibilities.
Fields
- Connection
This field connects Zenphi to your Google Directory account, enabling it to manage role assignments within your Google Workspace environment. - Customer Id
Input the Customer ID associated with your Google Workspace account. This ID identifies the organization in which the role assignment will be made. - Role Id
Enter the Role ID of the role you wish to assign. The Role ID corresponds to a specific, predefined role within your Google Workspace, allowing you to specify which permissions will be assigned. - Assigned to
Specify the email address or user ID of the user who will receive the role assignment. This field ensures that the correct individual is assigned the designated role. - Scope Type
Choose the scope of the role assignment, defining the level at which the role’s permissions apply. Options include:- Customer – Applies the role across the entire organization.
- OrgUnit – Limits the role’s permissions to a specific organizational unit.
- Org Unit Id
If Scope Type is set to OrgUnit, specify the Organizational Unit ID here. This restricts the role assignment to users within the specified organizational unit. Leave this blank if the scope is set to Customer.
Demonstration on how to use it in a flow
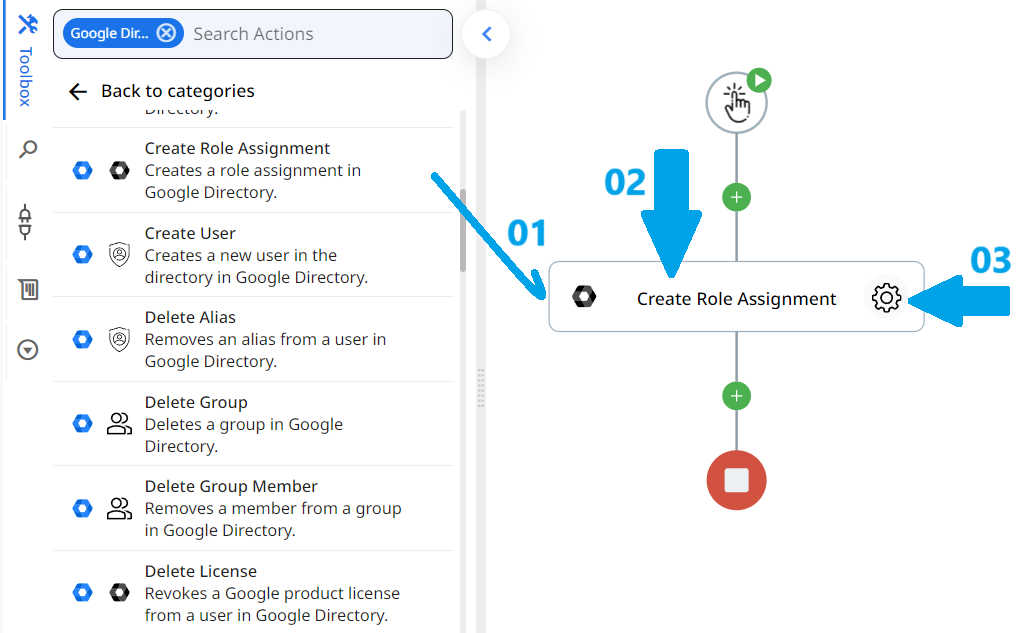
- Drag and drop "Create Role Assignment" action into the flow.
- Set the name of your choice or let it be as default.
- Click the gear icon to open its settings.

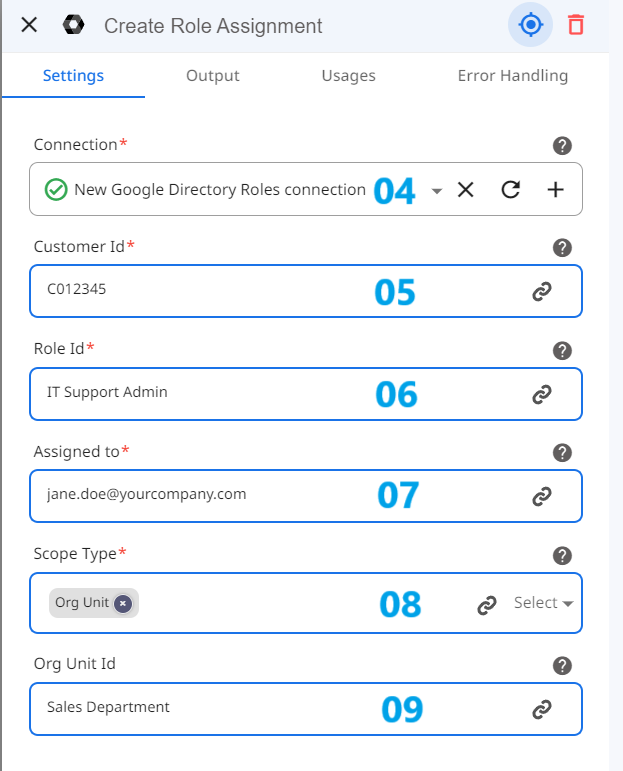
- Select the Google Workspace connection that has the necessary permissions to manage organizational units. If you don’t have a connection set up, create one by following the instructions to authenticate your Google account.
- Enter your Customer ID for the Google Workspace account where you are making the role assignment. For example, you might enter C012345 to identify your organization.
- Input the Role ID of the role you wish to assign to the user. For example, if assigning an “IT Support Admin” role, you would enter the corresponding Role ID for that role.
- Provide the email address or user ID of the user who will receive this role. For example, you could enter [email protected] to assign the role to this specific user.
- Choose the scope for the role assignment. Select Customer if the role should apply across the entire organization, or OrgUnit if it should apply only within a specific organizational unit.
- If you selected OrgUnit as the scope, enter the Organizational Unit ID here. For example, input the ID of the “Sales Department” OU to limit the role’s permissions to that unit. Leave this blank if the scope is set to Customer.

Conclusion
The "Create Role Assignment" action streamlines assigning roles to users within Google Workspace, allowing for precise control over user permissions. By completing the connection, Customer ID, Role ID, Assigned to, Scope Type, and Org Unit ID fields, you can ensure users have the correct access level according to their responsibilities and organizational structure.
Updated 9 months ago
