Create Role
Usage
The "Create Role" action in the Google Directory category for Zenphi allows you to create custom roles within your Google Workspace environment. This action helps in assigning specific permissions and privileges to users based on their responsibilities, ensuring precise access control across your organization. By defining roles with specific privileges, you can streamline user management and maintain security by granting users the appropriate level of access.
Fields
- Connection
This field connects to your Google Directory account, authenticating Zenphi to manage roles within your Google Workspace environment. - Customer Id
Input the unique Customer ID of your Google Workspace account. This ID identifies the organization where the new role will be created. - Role Name
Enter the desired name for the role. This should reflect the role’s purpose or responsibilities (e.g., HR Manager, IT Support Admin). - Role Privileges
Define the specific privileges or permissions for the role. Privileges determine what actions users assigned to this role can perform in your Google Workspace. You can use the Get Privilege action to fetch available privilege data, which will help you assign the appropriate permissions. - Role Description
Provide a brief description of the role. This can include details about the role's purpose, responsibilities, or any specific permissions assigned (e.g., This role manages user accounts and resets passwords).
Demonstration on how to use it in a flow
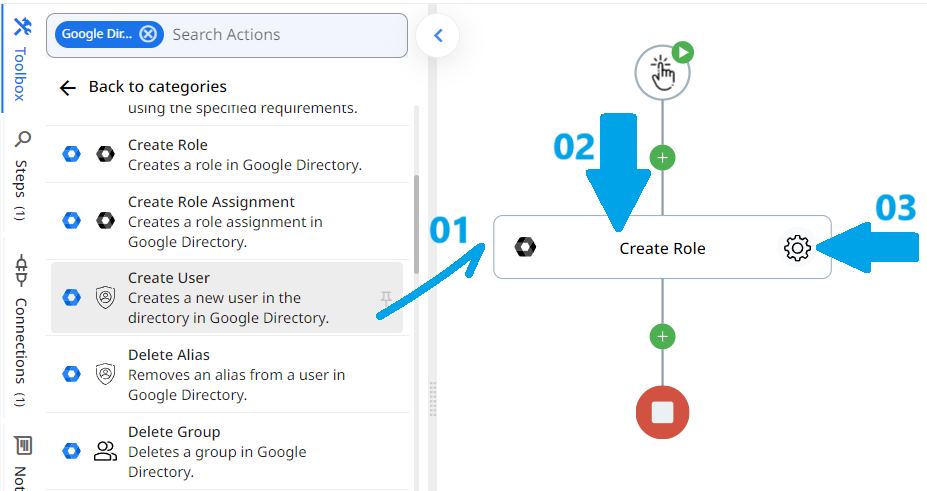
- Drag and drop "Create Role" action into the flow.
- Set the name of your choice or let it be as default.
- Click the gear icon to open its settings.

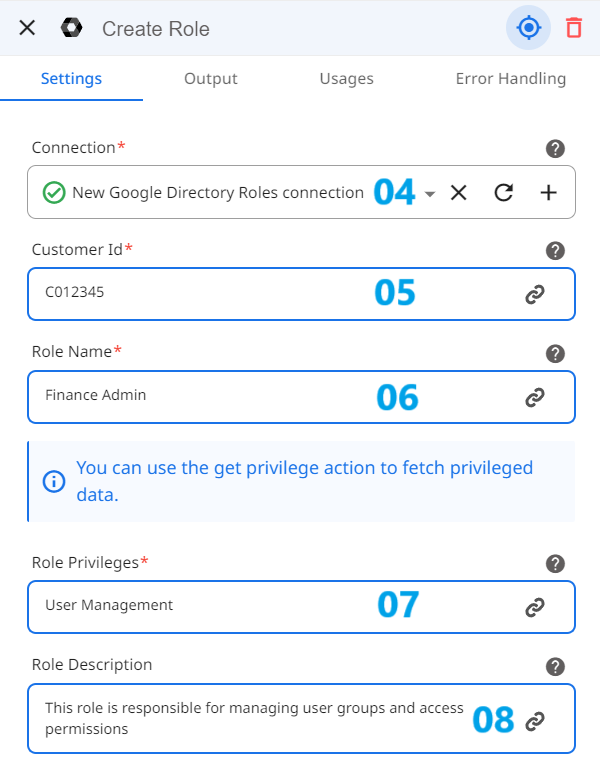
- Select the Google Workspace connection that has the necessary permissions to manage organizational units. If you don’t have a connection set up, create one by following the instructions to authenticate your Google account.
- Enter the Customer ID of your Google Workspace account. For example, you might input C012345 to identify your organization where the role will be created.
- Specify a name for the role that clearly defines its function. For instance, you could enter Finance Admin if you are creating a role to manage financial permissions.
- Define the privileges or actions this role should have access to. Use the Get Privilege action to fetch a list of available privileges and assign the necessary permissions. For example, you might add privileges such as User Management or Group Administration.
- Provide a description of the role, explaining its purpose and key responsibilities. For example, you could write, This role is responsible for managing user groups and access permissions.

Conclusion
The "Create Role" action simplifies the process of assigning custom roles in Google Workspace by defining specific privileges for users. By filling in the connection, Customer ID, Role Name, Role Privileges, and Description, you can efficiently manage access control and assign roles tailored to your organization’s needs.
Updated 9 months ago
