Send Document for Signing
Definition
The "Send Document for Signing" action in the DocuSign category allows you to send one or more documents for digital signing directly from your automated workflow. This action initiates a secure envelope through DocuSign and delivers it to designated recipients with predefined roles, signing order, and field assignments.
What makes this especially powerful—particularly when integrated into a Zenphi flow—is the ability to combine data collection and signing into a single user interaction. This reduces repetitive steps (like collecting data in one task and then signing in another), enables real-time data mapping into documents, and supports routing of completed documents and captured data to systems like Google Sheets, CRMs, or HR platforms. This action is ideal for dynamic document workflows like job offers, NDAs, contracts, and other approval-driven use cases.
Key capabilities include:
- Sending one or multiple documents for signing via DocuSign.
- Defining custom recipient roles, email messaging, and signing order.
- Inserting dynamic fields for input or signature directly within the documents.
- Capturing and outputting signed documents, audit certificates, and recipient actions like decline reasons.
- Enabling seamless integration with your internal systems for storing or processing signed data.
Example Use Cases:
1. Offer Letter Automation for New Hires
Automatically generate a personalized offer letter using candidate data, then send it for signing—all in a single flow. The document includes dynamic placeholders for name, role, salary, and start date, plus signature fields.
2. Client Contract Generation with Embedded Data
Use the "Create Document from Template" action to generate customized contracts that pull client details from a database (e.g., CRM or Google Sheets), then send it to the client to review and sign without further back-and-forth.
3. Purchase Agreement with Product Tables
Automatically generate a document that includes order details, pricing tables, and buyer information from a data source. Once prepared, the same document is sent to the customer for acknowledgment and digital signing.
4. Credit Card Request Forms
A department head triggers a credit card request form. The employee enters any additional info and signs it in one unified step. All captured data can also be stored in a backend system like Google Sheets or a database.
5. Internal Policy Acknowledgment
Send company policies, NDAs, or compliance documents to employees for reading and signing. Auto-fill the employee’s name, department, and manager dynamically using existing data.
6. Customized Client Intake Forms
Send intake forms to clients that are pre-filled with known information and allow them to fill out additional fields (medical history, personal info, preferences, etc.) and sign—all in one go.
7. Course Enrollment or Consent Forms
Educational institutions can send consent or enrollment forms with dynamic data like student names, courses, or schedules, embedded into the document, and request parent/guardian signatures.
📝 Important Note: Dynamic Placeholders and Personalized Envelopes
This is a key capability of this action—please read carefully.
When using the “Send Document for Signing” action, one of the most powerful features is the ability to dynamically generate fully personalized envelopes using placeholder fields within the document. This works especially well when combined with the “Create Document from Template” action.
Here's how it works:
-
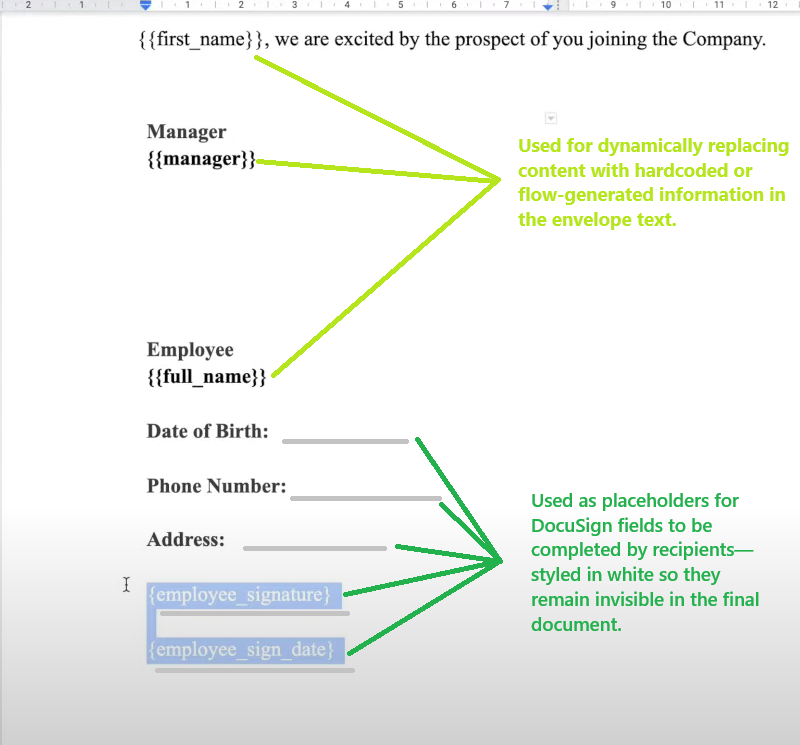
Two types of placeholders may be present in your document:
- DocuSign Fields: These are used for capturing user input such as signatures, dates, and text. To avoid clutter, these placeholders are often made invisible (e.g., set to white text color) in the final document sent through the envelope.
- Data Merge Fields: These are standard placeholders (e.g.,
{{Name}},{{Photo}},{{Address}}) that are replaced with actual data—such as user info, tables, or even images—before the document is sent for signing.
The “Create Document from Template” action enables you to:
- Insert dynamic content into your document before it is sent.
- Use data from external sources like databases, Google Sheets, or forms.
- Add personalized tables, user-specific images, and custom messaging.
- Create a fully customized and branded document for each recipient.
📌 **Real-World Example:**Imagine you're sending a contract to 100 customers. With this setup:
- You fetch each customer’s info (name, address, pricing details) from a database.
- You use it to populate a pre-designed template, including their logo or photo.
- You define DocuSign signature fields they must fill.
- You send out 100 fully personalized envelopes—all in a single automated flow run in minutes.
This approach streamlines complex workflows, ensures accuracy and personalization, and significantly reduces manual effort.
Inputs
Connection
This field connects your DocuSign account to the system. It enables the action to communicate securely with your DocuSign environment. Ensure the account has the necessary permissions to send envelopes and manage recipients.
Documents
**(This field is used to specify the document(s) that will be included in the envelope for signing.)**Upload one or more documents that you want to send for signing. These documents can include placeholders or pre-filled content. Use static PDFs or dynamically generated documents from actions like “Create Document from Template.”
Email Subject
**(This field allows you to specify the subject line of the email that will be sent to the recipients.)**This is the email subject your recipients will see. Use a clear and relevant subject that reflects the purpose of the document—for example, "Please Sign: Employment Agreement" or "Signature Request: Client Contract."
Email Message
**(This field allows you to include a personalized message in the email that will be sent to the recipients along with the document.)**Write a brief message that provides context or instructions to your recipients. This message will appear in the body of the email sent with the signing request. Personalization here helps improve clarity and engagement.
Enable Signing Order
**(This field determines whether the recipients need to sign the document(s) in a specific order.)**Enable this option if you want recipients to sign sequentially (e.g., Manager first, then Employee). If disabled, all recipients receive the envelope at the same time and can sign independently.
Recipients
**(You can add recipients to sign or view the document.)**Add the people involved in signing. Each recipient entry consists of the following subfields:
▶ Recipient Role
Defines the role or purpose of the recipient in the signing process, such as "Signer", "Approver", or "CC". Useful especially when using templates or creating logic based on roles.
▶ Full Name
Enter the full name of the recipient. This name appears in the DocuSign envelope and is used for identity and audit purposes.
▶ Email
Provide the email address where the signing request will be sent. Ensure the email is valid and accessible by the intended signer.
▶ Fields
This section allows you to define form fields the recipient must interact with in the document—such as signature blocks, dates, or text inputs.
▸ Field Type
**(Determines the type of input the recipient will fill out.)**Choose from available types like Signature, Date, Text, Checkbox, etc. These fields ensure the recipient provides required information in the document.
▸ Signature Placeholder
**(The placeholder text in the document where this recipient should fill or draw.)**Use this to match a field in your document (typically wrapped in unique text like {{signature1}}). DocuSign will place the interactive field at the location of this placeholder.
Step-by-Step Guide
This guide walks you through how to implement the action in your Zenphi flow. It assumes you’ve already generated or uploaded your document and are ready to send it for e-signature.
Step 1: Prepare Your Document
Before adding the action, make sure your document is either:
- Uploaded manually, or
- Dynamically generated using Zenphi’s Create Document from Template action.
Your document can contain two types of placeholders:
- Data placeholders (e.g.,
{{employee_name}},{{start_date}}) for pre-fill using previous steps - Signature/input placeholders (e.g.,
{{employee_dob}}) for recipients to complete — often styled with white font to remain invisible in the PDF.
Step 2: Add the “Send Document for Signing” Action to the Flow
- Drag and drop the Send Document for Signing action into your flow.
- Connect it to the previous step (e.g., document creation or data retrieval).
Step 3: Configure the Action Inputs
Let’s now fill in the configuration:
** Documents**
- Select the output of your Create Document from Template step (or a static file).
- Multiple documents can be added to the same envelope if needed.
** Email Subject**
- Use a dynamic value (e.g.,
"Offer Letter for {{employee_name}}") to personalize it.
** Email Message**
- Provide a clear message explaining what the recipient needs to do.
- Example:
"Hi {{employee_name}}, please review the offer letter, complete the required details, and sign at your earliest convenience."
** Enable Signing Order**
- Toggle this ON if one recipient (e.g., candidate) must sign before the next (e.g., manager).
- Toggle OFF for simultaneous signing.
Step 4: Add Recipients
Click “Add Recipient” for each person who needs to sign the document.
For Each Recipient, Provide:
- Role Name: e.g.,
Candidate,Manager - Full Name & Email: Can be static or pulled dynamically (e.g., from a Google Sheet)
** Add Fields for Each Recipient**
- Click “Add Field” under the recipient.
- Choose the Field Type (Text, Signature, Date, etc.).
- Enter the Signature Placeholder matching the document’s text placeholder (e.g.,
employee_dob,sign_date). - Name the field for reference (e.g., “Employee DOB”).
👉 Important: These placeholders must match exactly what's in your document (even case sensitivity).
Step 5: Map Dynamic Values (Optional but Powerful)
If your document contains data placeholders like {{employee_name}}, make sure to:
- Populate those placeholders using the Create Document from Template step
- Or dynamically pull them from a Google Sheet, database, or form submission
Step 6: Save & Run the Flow
-
Save your flow and run it in Test Mode or live.
-
Zenphi will:
- Generate the document (if using templates)
- Insert pre-filled values
- Send the envelope to the recipients
- Wait for signing to complete
- Output the signed PDF and all collected field data
✅ After the Action Runs
Once the envelope is signed:
-
You can access all field values using the output fields (like “fields” or “payload”)
-
You can pass those values into:
- A Google Sheet row
- A CRM or HR system
- An email notification
- A Google Drive folder (for storing the signed file)
📤 Outputs
Envelope ID
**(Id of the created envelope)**This is the unique identifier for the envelope created and sent via DocuSign. You can use this ID to track the envelope’s status, follow up with signers, or retrieve related documents later.
Event Time
⏱ **(Date and time of the event)**The exact timestamp when the envelope status was last updated—whether it was sent, completed, declined, or voided. Useful for tracking or triggering subsequent actions based on timing.
Outcome
**(The outcome of the action. Possible values are: completed, declined, voided)**Indicates the final state of the signing process:
completed: All recipients have signed successfully.declined: One or more recipients refused to sign.voided: The envelope was canceled before completion.This is key for automation logic (e.g., only move forward if completed).
Payload
**(The content of the signed document)**Returns the actual signed document in file format. This file includes all signatures and completed fields and can be stored, shared, or sent for further processing.
Certificate Payload
**(The content of the certificate of completion document)**Provides a formal, legally binding certificate from DocuSign that records the signing events, including timestamps and recipient actions. Important for auditing and compliance purposes.
Declined By Name
**(The name of the recipient who declined to sign. Only has value if the outcome is declined.)**If someone rejected the signing request, this output returns their full name. Helps in follow-up actions or resolving issues manually.
Declined By Email
**(The email address of the recipient who declined to sign. Only has value if the outcome is declined.)**Captures the exact email of the person who declined. Useful for sending alerts, updates, or assigning to a different signer.
Declined Time
**(The date and time when the recipient declined to sign. Only has value if the outcome is declined.)**Logs when the signing was declined, which can be helpful for internal reporting, compliance checks, or customer service.
Declined Reason
**(The reason mentioned by the recipient who declined to sign. Only has value if the outcome is declined.)**Some users provide a reason when they decline to sign. This message helps you understand and potentially address objections or mistakes.
Fields
**(The added fields)**Returns a summary of all interactive fields defined in the document (e.g., name fields, signature blocks, dates). Helps confirm that required fields were correctly processed and included in the final envelope.
📌 Example of a Situation
Use Case: Sending a personalized offer letter to a job candidate, collecting extra details, and getting it digitally signed by both the candidate and the manager.
👤 Scenario
An HR team wants to automate the onboarding process by generating offer letters tailored to each candidate. They need to:
- Pre-fill known information (name, position, salary)
- Ask the candidate to provide missing details (e.g., phone number, address, date of birth)
- Get the candidate’s signature
- Forward the document to the hiring manager for final signature
- Store the collected info in a Google Sheet
- Save the signed documents in Google Drive
🛠 How It’s Set Up in the Flow
-
Trigger: The flow starts when a new file is added to a Google Drive folder with candidate data.
-
Create Document: A Zenphi template is used to generate an offer letter with placeholders like
{{employee_name}},{{start_date}}, and fields likeemployee_dob(in white font). -
Send Document for Signing:
-
Document: Output from the Create Document step
-
Recipients:
- Candidate: Enters missing info and signs
- Manager: Signs only
-
Fields: Mapped to placeholders like
employee_dob,employee_address,employee_phone,sign_date -
Signing Order: Enabled (candidate signs before manager)
-
-
Output Use:
- Signed fields from the candidate are extracted using output
fields - Info is saved in Google Sheet
- Documents and certificates are stored in Drive
- Signed fields from the candidate are extracted using output
This setup turns what used to be two separate manual steps (data collection + signing) into a single seamless experience for both the candidate and the HR team — saving time, reducing errors, and improving onboarding quality.
Updated 6 months ago